I’m a little late to the party with Hyperduck, but maybe you are, too, so I’m spreading the word.
Hyperduck is an app that you install both on your Mac plus one or more other Apple devices — iPhone, iPad or Vision. Once that’s done you’ll find a new option when sharing a web page from one of said devices: “Send to Mac”.
Choose that option, and the next time you’re at your Mac, you’ll see the page sitting there open on your default browser. This is super handy if you want to deal with something later and want it in your face so you don’t forget.
Hyperduck also sends other types of URLs — one that will run a shortcut, for example. There are few things I like better than a good automation, so I’m looking forward to exploring that one. Read this MacStories article to get started.
We’re getting another pile-on today about how terrible Siri is. It seems there is no end to the number of ways people can find to hate on Apple's digital assistant.
The popularity of this pastime may be catching up with the National Football League. Don't believe me? Just for fun, I created this Google Ngram.
I made the comparison because the latest round of rage started with Paul Kafasis at One Foot Tsunami, who got spectacularly bad results when asking Siri about winners of Super Bowls. John Gruber picked up on this and added his own test at Daring Fireball. Juli Clover reported on the mess at MacRumors. And the Apple subreddit has at least 3,400 comments about it.
So I tried it myself. I asked Siri to give me Super Bowl results the same way Kafasis did — by using roman numerals. For example, “Who won Super Bowl XXV?” Like him, I pronounced “XXV” as 25.
I did this on a 2017 iMac running macOS 13 Ventura, which cannot be upgraded to a later OS, and thus does not have Apple Intelligence. I asked the questions for several Super Bowls while having Wikipedia’s list of Super Bowl winners open for reference.
At first Siri seemed to be doing OK, giving correct answers along with details of the games. But it got worse over time, and couldn’t give any correct answers.
Now, I’m not a fan of the NFL, but I’m pretty sure even diehards would be hard pressed to tell you the difference between, say, Super Bowl XXV and Super Bowl XXVI. These numbers don’t give any context.
So I tried asking the question in what to me seems like a more normal way — by the year in which the game was played. Instead of asking, for example, “Who won Super Bowl XXV?”, I asked “Who won the Super Bowl in 1990?”. A lot of things happened in 1990. The year provides a frame a reference.
Asked this way, Siri gave the right answer every single time.
This is not about making excuses for Siri. I almost never use it. In a case like this, it makes more sense to use Wikipedia or maybe the NFL's website. Still, if posing a question in a certain way doesn't work, why not try a different way? I do this with ChatGPT all the time.
I guess I just wish that if someone is truly interested in testing Siri they would come up with something a little more rigorous. When I read Kafasis’s post, I thought it made for an amusing anecdote, and I'm pretty sure that's what he intended. Looks like others decided to, ahem, take the ball and run with it.
Back in the day at the tai chi club, we used punch cards to keep track of how many classes people attended. After 10 punches, you had to pay for 10 more classes.
Then they put me in charge.
I didn’t want to be rooting around a box of cards at the beginning of every class as I tried to keep track of who had shown up that day. My solution was virtual punch cards on a web page — designed to look old-timey with CSS and using names and numbers fed to it by JavaScript.
But that meant the unpleasant prospect of updating JavaScript after every class, so those cards sat idle for many months. Meanwhile, I looked for a way of keeping track of people taking classes that didn’t involve real punch cards.
My natural inclination was to turn to technology — maybe a spreadsheet or some kind of app. I went through a lot of ideas that were way more complicated than they needed to be. Then I learned about tally apps.
Tally ho
Do a search on “tally” in the App Store, and you will find yourself swimming in suggestions. A tally app basically just counts things for you, so of course it’s easy to develop, and there is a plethora of them.
Still, counting was really all I needed to do. Each person attending a tai chi class is a tally in a list of tallies. If they show up, I tap the plus button beside their name, and thus update the number of classes they have attended.
After trying several tally apps, I settled on one called Tally, by Agile Tortoise, that rises above the rest. It does that with support for Shortcuts.
The Shortcuts app, which comes free with Apple devices, allows you to put together a series of actions which can be invoked with the press of a button.
Jason, meet JSON
The shortcut I made uses one of the Tally app’s own actions to get the tai chi club’s list of tallies. Other actions convert this into a JSON file and save it to iCloud Drive. This is a handy spot for a file because I can easily access it with my Mac.
It needs to formatted as JSON, so I can upload it to our website’s server where JavaScript uses it to spit out virtual punch cards with the correct names and numbers. Yes, it really is just a bunch of names and numbers, but I wanted these names and numbers to be displayed in a way that feels familiar. And punch cards are familiar.
I did this with the magic of JavaScript, but there was still one piece missing. I didn’t want to have to upload the JSON file after every class. It would be more work, and what if I forgot?
The solution was more automation.
I needed a way to take the JSON file from iCloud Drive and upload it the server. If the JSON file is updated by the Shortcuts app, that means that tallies have been updated, and the virtual punch cards also need to be updated.
That syncing feeling
A good old app called FreeFileSync came to the rescue. I showed it where to find the JSON file on iCloud Drive and where to find the equivalent file on the web server. With this information, it created something called a batch run that keeps the two files in sync — double-click it, and it runs.
I didn’t want to have to remember to double-click it, so I created an Automator script that does this for me. Automator is yet another automation app that comes free with your Mac. Again, though, that would mean clicking the script to run it. So I went deep into the bowels of Terminal and instructed a daemon called launchd to watch the JSON file. If it detects an update, it executes the Automator script, which in turn executes the FreeFileSync batch run.
I wish I could have skipped the intervention of Automator, and had FreeFileSync work directly with launchd. Alas, this was taking way too long, and Automator was the easy way out.
The only catch is that the Mac has to be awake in order for launchd to work. It’s a small price to pay, but as an incurable tinkerer, I may yet find a workaround. (Edit: Looks like pmset is the most reliable way of waking your Mac on a recurring schedule.)
To top things off, this whole chain of automation is fired off by a setting in the Shortcuts app that makes the shortcut run when I close the Tally app on my iPhone.
Nerd creds
It seems like there should be an easier way. Ideally, you should be able to do all this from the Shortcuts app on the iPhone. There is a Shortcuts action that is supposed to connect to a server and run a script to upload files, but I could not make it work. None of ChatGPT’s suggestions panned out. Questions left in Apple and Reddit forums went unanswered.
The system I came up with could only be appreciated by an automation nerd, but it works.
If you’re an RSS stalwart like me, you may be on the lookout for cool new feeds. One way to go exploring is with random posts from indieblog.page.
You can subscribe to a daily feed of one, three, five or 10 posts. Or you can go weekly with five, 10, 15 or 20 posts.
I’ve been trying it for a few days now — 10 a day, baby! — and been receiving a steady diet ranging from the arcane to the mundane, with many curiosities in between.
There’s been nothing I want to subscribe to yet, but I’m OK with that. It’s still early days.
Edit 10 days later: I've found about half a dozen that I liked enough to subscribe to. It's been a worthy experiment.
I joined a trend and listed my default apps last year at about this time, so why not give an update?
A few things have changed.
I now do most of my photo editing with Preview instead of Photoshop. It’s fast to load and covers my simple needs. Take the time to learn its quirks, and it might be enough for you, too.
I’m still all-in with Reeder. It took awhile to get used to the new version, but now I love it.
My main browser is now Safari on both desktop and mobile. I occasionally use Firefox for web development.
I deleted all Microsoft office apps after I moved on from the employer who made them available to me. For word processing or spreadsheets, I use Pages and Numbers. In a pinch, I might use Google’s equivalents.
For budgeting and finance, I use a pretty little app called Fleur. It’s a one-time payment, covers the basics, and works on all my Apple devices.
I still use Bitwarden for password management on my iMac because it's too old to upgrade to Sequoia. But on my iPad, I happily use Apple Passwords.
I've tried out many code editors, but keep coming back to the comfort of VS Code.
For music, I’m actually more likely to use Soma FM.
I’ve been tracking the books I read with an iPad app called Book Tracker since the beginning of the year.
The app has an export function, so I was able to get all that data and put it on the web for everyone to see.
The books are in order of how I rated them, from best to worst. If I finished a book with the feeling of “mind blown”, I gave it a 10. Piranesi and The Wager both did this. When Breath Becomes Air almost did it, but was spoiled by the epilogue.
At the bottom are books that I slogged through with the hope that they would get better. They never did. I was especially disappointed with The Night Circus because I had heard it was similar to Piranesi. Maybe in a superficial way, but not really.
I won’t get into the details, but if you want to create something similar, it involves exporting the data as a CSV file, converting it to JSON, and using the JavaScript fetch() function to grab it.
Some of the data was either missing or formatted poorly so I spent some time fixing it up.
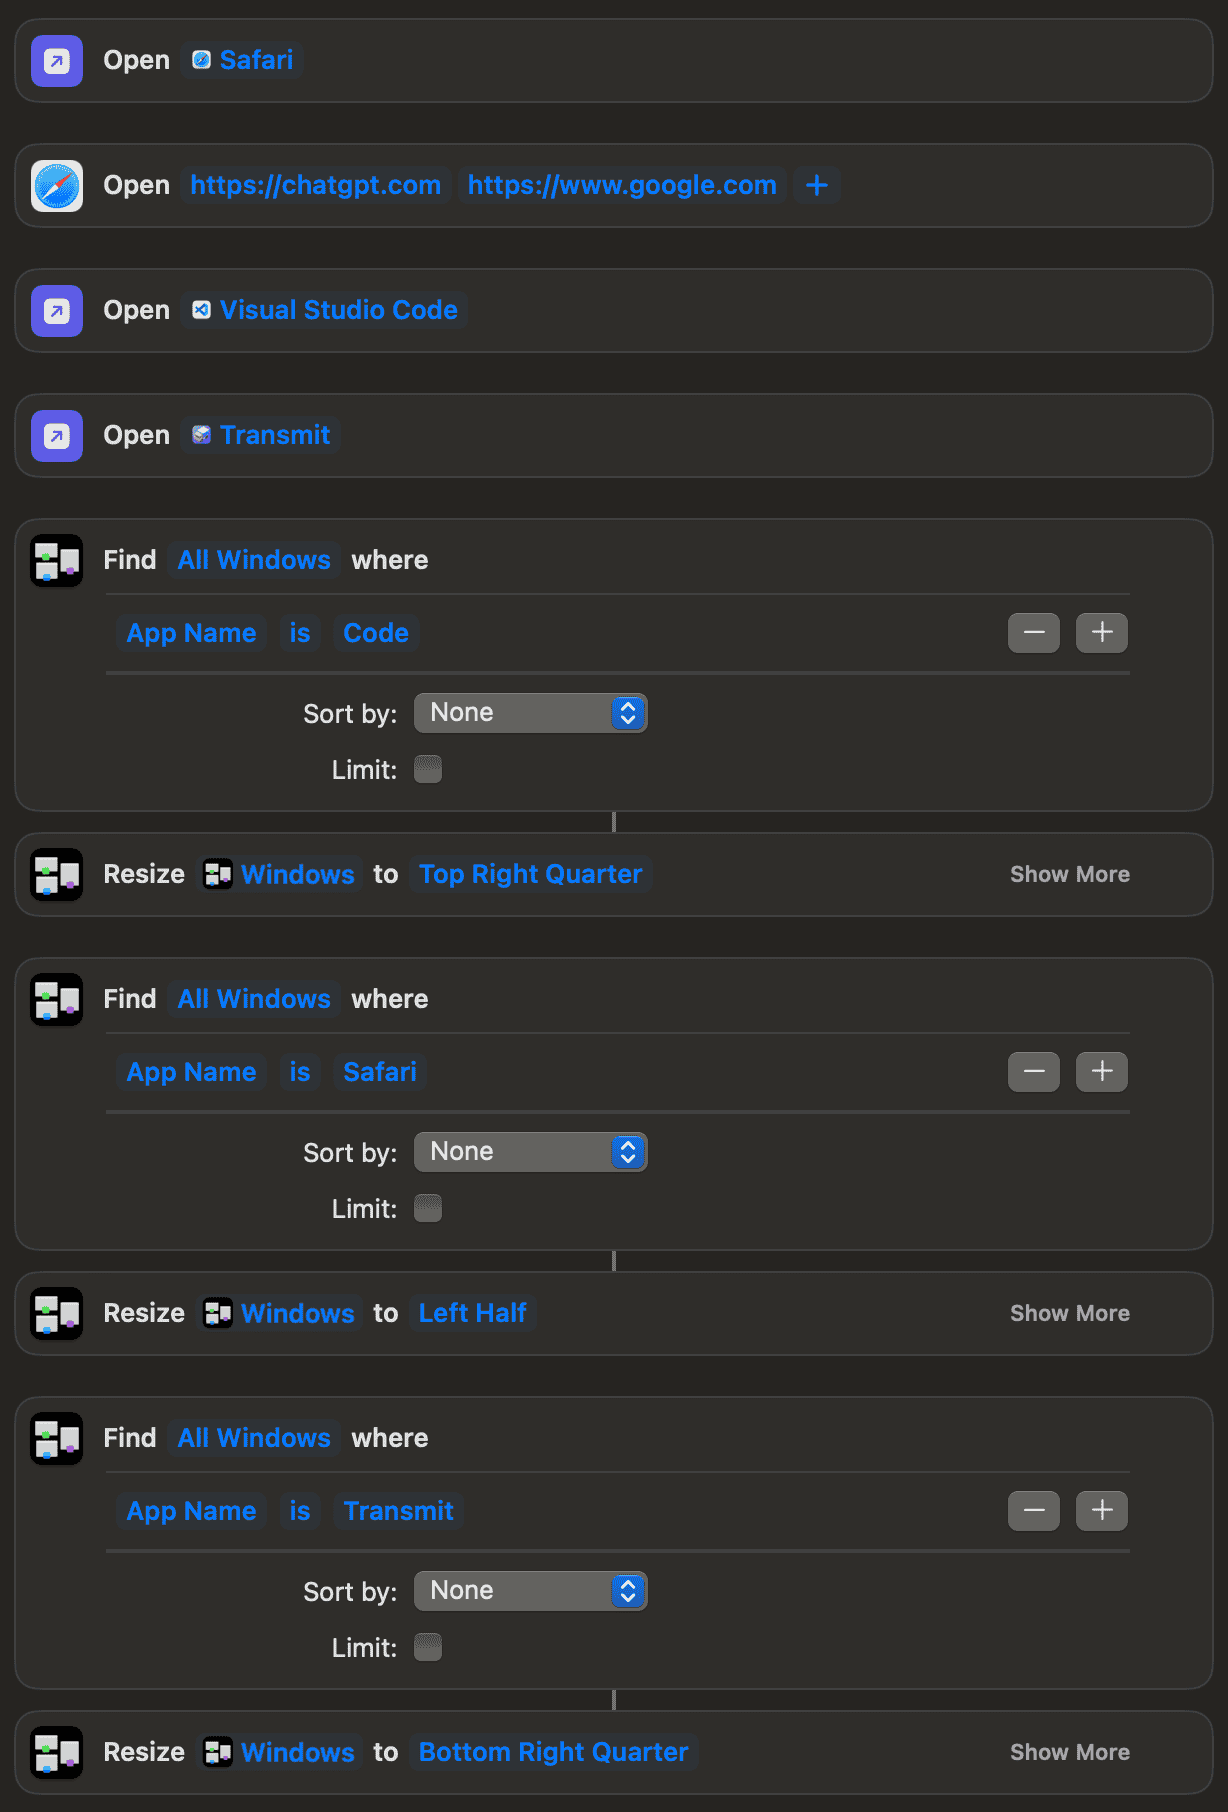
So you need to do some work on your Mac that involves opening a few apps. One of them is a browser with a couple of tabs open. You want the windows for the apps placed just the way you like them.
And you want this workspace to appear with a single click.
You could buy an app to do this for you — there are a few good ones out there. Or you could use the Shortcuts app that comes with your Mac. Here’s how.
Before we get started, though, if you’re not familiar with the basics of Shortcuts, I suggest you watch the free sample videos in the course from the incomparable MacMost.
You build a shortcut by dragging in actions from the right sidebar, which can be found by typing in the search area.
Start off by pulling in one “Open App” action for each app you want to open. Click on the word “app” and change it to the name of the app you want to open.
If one of those apps is Safari, you can get it to open tabs with the “Open URLs” action. Other browsers are trickier, and you might have to resort to using an AppleScript snippet.
Now drag in one “Find Windows” action for each app. Click on “Add Filter”. Change “App Name is anything” so it reflects the name of the app you’re working on. The name of the app might not always be clear — for example, is it VS Code, Visual Studio Code, or just Code? A good guide is to use the name in the app’s menu bar. In this case, it is just Code.
Finally, you need to attach a “Resize Window” action to each “Find Window” action. Set this action so it puts the window for each app where you want it — for example, “Resize Windows to Left Half”.
If you’re not happy with the pre-sets for window sizing, you can use Dimension, and give an exact size in pixels. If you do this, you will also need to drag in an action called “Move Window”. This is so you can tell Shortcuts where to put the window after it’s been resized.
Test your shortcut by clicking on the arrow on its title bar. It should open the open the apps and URLs, then move their windows to areas you specified.
To save this shortcut, click on the tab in the right sidebar with an “i” inside a circle. You can pin it in the menu bar, make it a quick action, create a keyboard shortcut — and more. Under the File menu, you can add it to the dock.
Here's how it could be done with Safari, VS Code and Transmit:
Reeder is a much loved RSS feed reader for Mac, iPad and iPhone. Or at least it was until its latest update.
The new concept was a bit too weird for me — and apparently for a lot of other people as well — so I put off testing it and stuck with what is now known as Reeder Classic. Good old Reeder was good enough for me.
But curiosity about a feature called shared feeds finally got the best of me. So I downloaded the app to my iPad and paid for an annual subscription, which worked out to a little over a dollar a month.
Setting up a shared feed was fairly easy. I created a tag called “latest” and tagged a few items with it. I then went to the “latest” folder, long pressed and had a look at its settings. In the sharing section you can turn on a public JSON feed and give it a name. You get a public URL, which you can share.
Here’s the feed I made. It’s hosted by Reeder’s developer at reederapp.net.
Now, every time I tag an item with “latest,” it shows up in this public feed. I’m not sure what to do with this, but it definitely has a coolness factor.
It would be even cooler, though, if you could embed it on a website. There's no way to do this from within the app, but you can grab a JSON feed with a little JavaScript — if the server allows it. This one — as a security precaution — does not. The workaround is to create a proxy with PHP.
It took a lot of fussing with the help of ChatGPT, but here’s what I managed. I like how it turned out. An embed like this could possibly be used to give readers updates from other websites. I hope the developer eventually allows you to create embeds from the app.
Will I actually use it? I’m still thinking about it.
Update: I've created a Likes section for newsonaut. Check it out to see the articles I like.
Four years ago, I wrote about using siftrss to filter out unwanted items from your RSS feeds “in these troubled times.”
The times are just as troubled as ever, so I’m once again recommending siftrss, but this time I have a better idea of how it works.
Say, for example, you wanted to subscribe to Techmeme’s feed, but didn’t want any items with Trump or Musk in the title.
First, go to siftrss and put in the feed URL for Techmeme. That would be: techmeme.com/feed.xml
Change the first dropdown to “exclude”, the second to “title” and the third to “matches regex”. You need to use regex if you want to exclude more than one keyword.
Fill in the blank with /Trump|Musk/i. This tells the filter to exclude any items that have the word “Trump” or “Musk” in the title. The i at the end makes it case insensitive, meaning the filter works regardless of whether the words are upper or lower case.
If you’re familiar with regex, siftrss uses the Perl Compatible Regular Expressions implementation.
Here are some more examples:
Exclude any items with one of these four keywords: /keyword1|keyword2|keyword3|keyword4/i
The pipe symbol means “or”.
Exclude any items with both of these keywords: /keyword1&keyword2/i
The ampersand means “and”.
I find that taking breaks from certain individuals does wonders for my sense of well-being.
Bonus tip: Hacker News
I use a free app called Hack to read Hacker News. It has a massive number of settings, including one that filters items based on keywords. It’s way down at the bottom under Filters & Blocks — don’t miss it!
Window management — or the lack of it — comes up a lot in forums where people talk about Mac stuff. The next version of macOS will improve the situation, but it will be minimal compared with some of the features you can get with an app.
I first learned about how much better window management could be when I was forced to use Windows for a few years at work. I disliked everything about it except the ability to move windows to the sides and have them each take up half the screen.
What impressed me even more was grabbing the space between the two windows and resizing the widths of both at the same time. I especially like this setup with a code editor on one side and a web browser on the other.
My search for free similar functionality on a Mac led to me 1Piece, which is humbly described as an app that “includes many features to improve the usability of your Mac.”
It then goes on to describe an amazing 21 features — plus “others”.
Among these features is window management, which includes my wish — the ability to resize the widths of side-by-side windows at the same time. But there’s lots more.
If you find it tedious to grab each window and drag it to the side, you can use the “left + right” command. It takes the top two windows and places them side by side with one click.
Split Assist creates a display of open windows you can choose from to take up the other half of the screen. Or you can decide to put two of them into quarters.
You’re not limited to the usual halves and thirds. You can, for example, choose the top two thirds. Or you can set up a four by six grid and choose whatever portion of the screen you want.
Of course, you can set up hot keys for any of these.
You can also create presets — get a window just way you want it, then use the preset any time you want it that ideal size.
A tweak function puts handles on the edges of the top window so you can change its size a pixel at a time by using your keyboard.
You might think this is a lot in a free app — and it is! But “window management” is just one of the over 21 features it has.
Another much requested function I see is the equivalent of alt-tab in Windows. 1Piece has this covered with a feature called Window List. You hit option-tab, and get a list of all your open windows along with previews. You can tweak the list by making it show only the windows in a particular app. You can also make it show only minimized windows — plus much more.
Related to this is Desktop Windows. When invoked, it displays an interface showing all the open windows, allowing you to choose the one you want.
Describing all the functions of this app would be a monumental task. I found myself going down many a rabbit hole when I opened the preferences. So I’ll mention just a few more that caught my eye.
Hitting control-option-command-M moves your mouse pointer to the centre of the screen. Hitting control-option-command-H hides it.
You can set up a favourite window, and create a hot key to bring it into focus.
You can open a contextual version of the active app’s menu bar by hitting shift-command-1.
You might be wondering where this app has been all your life. It first came out in 2014, so that’s 10 years of development. As of this writing, the latest version came out on May 27, 2024.
Who is the developer? Other than his name — Takahiro Fujita — there is precious little information. The website has a Japanese translation, so it’s a safe bet that he is based in Japan.
I’m also going to guess he is a fan of anime. It’s too much of a co-incidence that 1Piece bears a name so similar to One Piece, the story of a search for a mythical treasure.
1Piece itself is like a treasure chest overflowing with gems.